How To Fit Vinyl Sheeting
23 January 2014

Source: www.floormaker.co.uk
Once you’ve picked out some vinyl flooring for use in your kitchen or bathroom, you’ll need to start thinking about fitting it. While you can have it laid professionally, it isn’t too difficult to do so yourself and it will help to lower the overall costs.
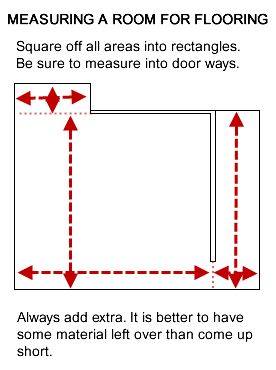
Start by measuring the room you’ll be fitting the vinyl flooring in carefully. When you order the product you’ll have a choice of widths as well as lengths so you can find the most appropriate size. If you’re using sheet vinyl, it will look much better to lay the whole thing in one large and seamless piece than to have to use several strips. It might be necessary if your room is particularly large, but most floorings will be available wide enough for the majority of rooms.

Source: www.wfca.org
Allow 50-100mm extra at each edge of the room. This will give you room to play with and make sure you’re able to get a neat finish which sits flush to the skirting board or wall. It’s much better to end up with too much vinyl flooring than not enough. For a small amount more you’ll be able to guarantee that your room looks lovely, and the floor is completely waterproof. The off cuts can come in handy as well.
You will need to keep the roll of vinyl in the room where you plan to lay it for at least 48 hours prior to installation. The warmth of the room will prevent brittleness.
Any lumps and bumps will show through the vinyl, and make your job look less neat. If your floor isn’t totally smooth, or your putting the vinyl over floor boards, begin your project by laying plywood over the entire area first. It might add to the time it takes you to lay the floor, but in the long run it will make the whole thing look a lot better.
You will also need to make sure the floor is completely dirt free before you begin. Sweep carefully and vacuum to get rid of any debris. The adhesive will also hold better on a clean floor, so don’t skip this step.
The Basic Technique
Before going further, make sure you have everything you need to hand, to make the process easier. Fashion a scribing gauge by hammering a nail into a small piece of wood, 30mm from one end until the point of the nail is just coming through the other side.
You’ll need:
- A utility knife
- Scissors
- A bolster chisel
- Metal straight edge
- Vinyl adhesive
- Your vinyl flooring
You’re ready to start! Unroll your vinyl, and place the longest side next to the longest wall with the fewest obstructions. Fit it around 25mm from the skirting. Move your homemade scribing gauge along the skirting so that the nail marks the vinyl with the exact pattern of your skirting. Cut with a knife or scissors (you might find the utility knife more accurate as you’ll be able to see exactly what you’re doing), and push the vinyl up against the skirting.
For the other walls, cut a notch into each internal corner with scissors. This will allow the excess to fold up neatly at the edges rather than make your vinyl buckle. Press the vinyl into the point where the skirting and floor meet, before using your chisel to make a sharp crease.
Using a metal straight edge to aid you, cut along the crease at a slight angle. For external corners the process is similar, but cut a straight line instead of a notch.
Once everything’s in place, apply your vinyl adhesive. Some require you to cover the underside of the vinyl, while others simply spray on. Read the instructions on yours for the best possible finish.
More news from Remland Carpets